about
project name
L1 Rocket (V2)
date
on hold
overview
This is my second attempt in building a high-powered model rocket to obtain the L1 (Level 1) certification from the Tripoli Rocketry Association. The new rocket is based on the first L1 rocket and incorporates my learnings from building and launching its predecessor.
background
I designed and launched a rocket between August and October 2023 to obtain an L1 (Level 1) certification from the Tripoli Rocketry Association (TRA). However, I did not acquire my L1 certification despite the rocket's successful launch and landing as I failed to recover the rocket in time for the post-flight inspection.
Although I was disappointed that I missed the opportunity to obtain an L1 certification, I thoroughly enjoyed the process of designing and building my own rocket, and gained immense satisfaction from the successful launch.
Hence, I'm resolved to build another rocket for the L1 certification, and will be designing this rocket with the learnings I acquired during the previous rocket's build and launch.

My first L1 Rocket [01/10/2024]
background
I designed and launched a rocket between August and October 2023 to obtain an L1 (Level 1) certification from the Tripoli Rocketry Association (TRA). However, I did not acquire my L1 certification despite the rocket's successful launch and landing as I failed to recover the rocket in time for the post-flight inspection.
Although I was disappointed that I missed the opportunity to obtain an L1 certification, I thoroughly enjoyed the process of designing and building my own rocket, and gained immense satisfaction from the successful launch.
Hence, I'm resolved to build another rocket for the L1 certification, and will be designing this rocket with the learnings I acquired during the previous rocket's build and launch.
My first L1 Rocket [01/10/2024]
new goals
Similarly to its predecessor, the new L1 rocket will be designed to fulfill the L1 certification requirements, which include launching with an H/I impulse class rocket motor, incorporating a parachute recovery system, and being robust enough to remain flightworthy after launch and recovery. Thus, the challenges identified in my first L1 project also apply to this project.
In this project, the challenges regarding durability are important concerns as I did not manage to recover my previous rocket and inspect it for damage. Given the possibility that my previous L1 rocket was not robust enough to remain flightworthy after launch and recovery, I decided to err on the side of caution by designing the new L1 rocket with a greater emphasis on durability.
I also believe that the previous L1 rocket's design could have been simplified to reduce its manufacturing duration, and plan to incorporate this in the upcoming L1 rocket design.
Hence, my primary goals for the revised L1 rocket's design are:
#1
To reuse components that worked well in the previous L1 rocket and adapt them to the new design if needed,
#2
To design components that minimize potential points of failure in the new L1 rocket.
#3
To avoid redundant components in the new L1 rocket and maintain simplicity in its components' design.
key design choices & revisions
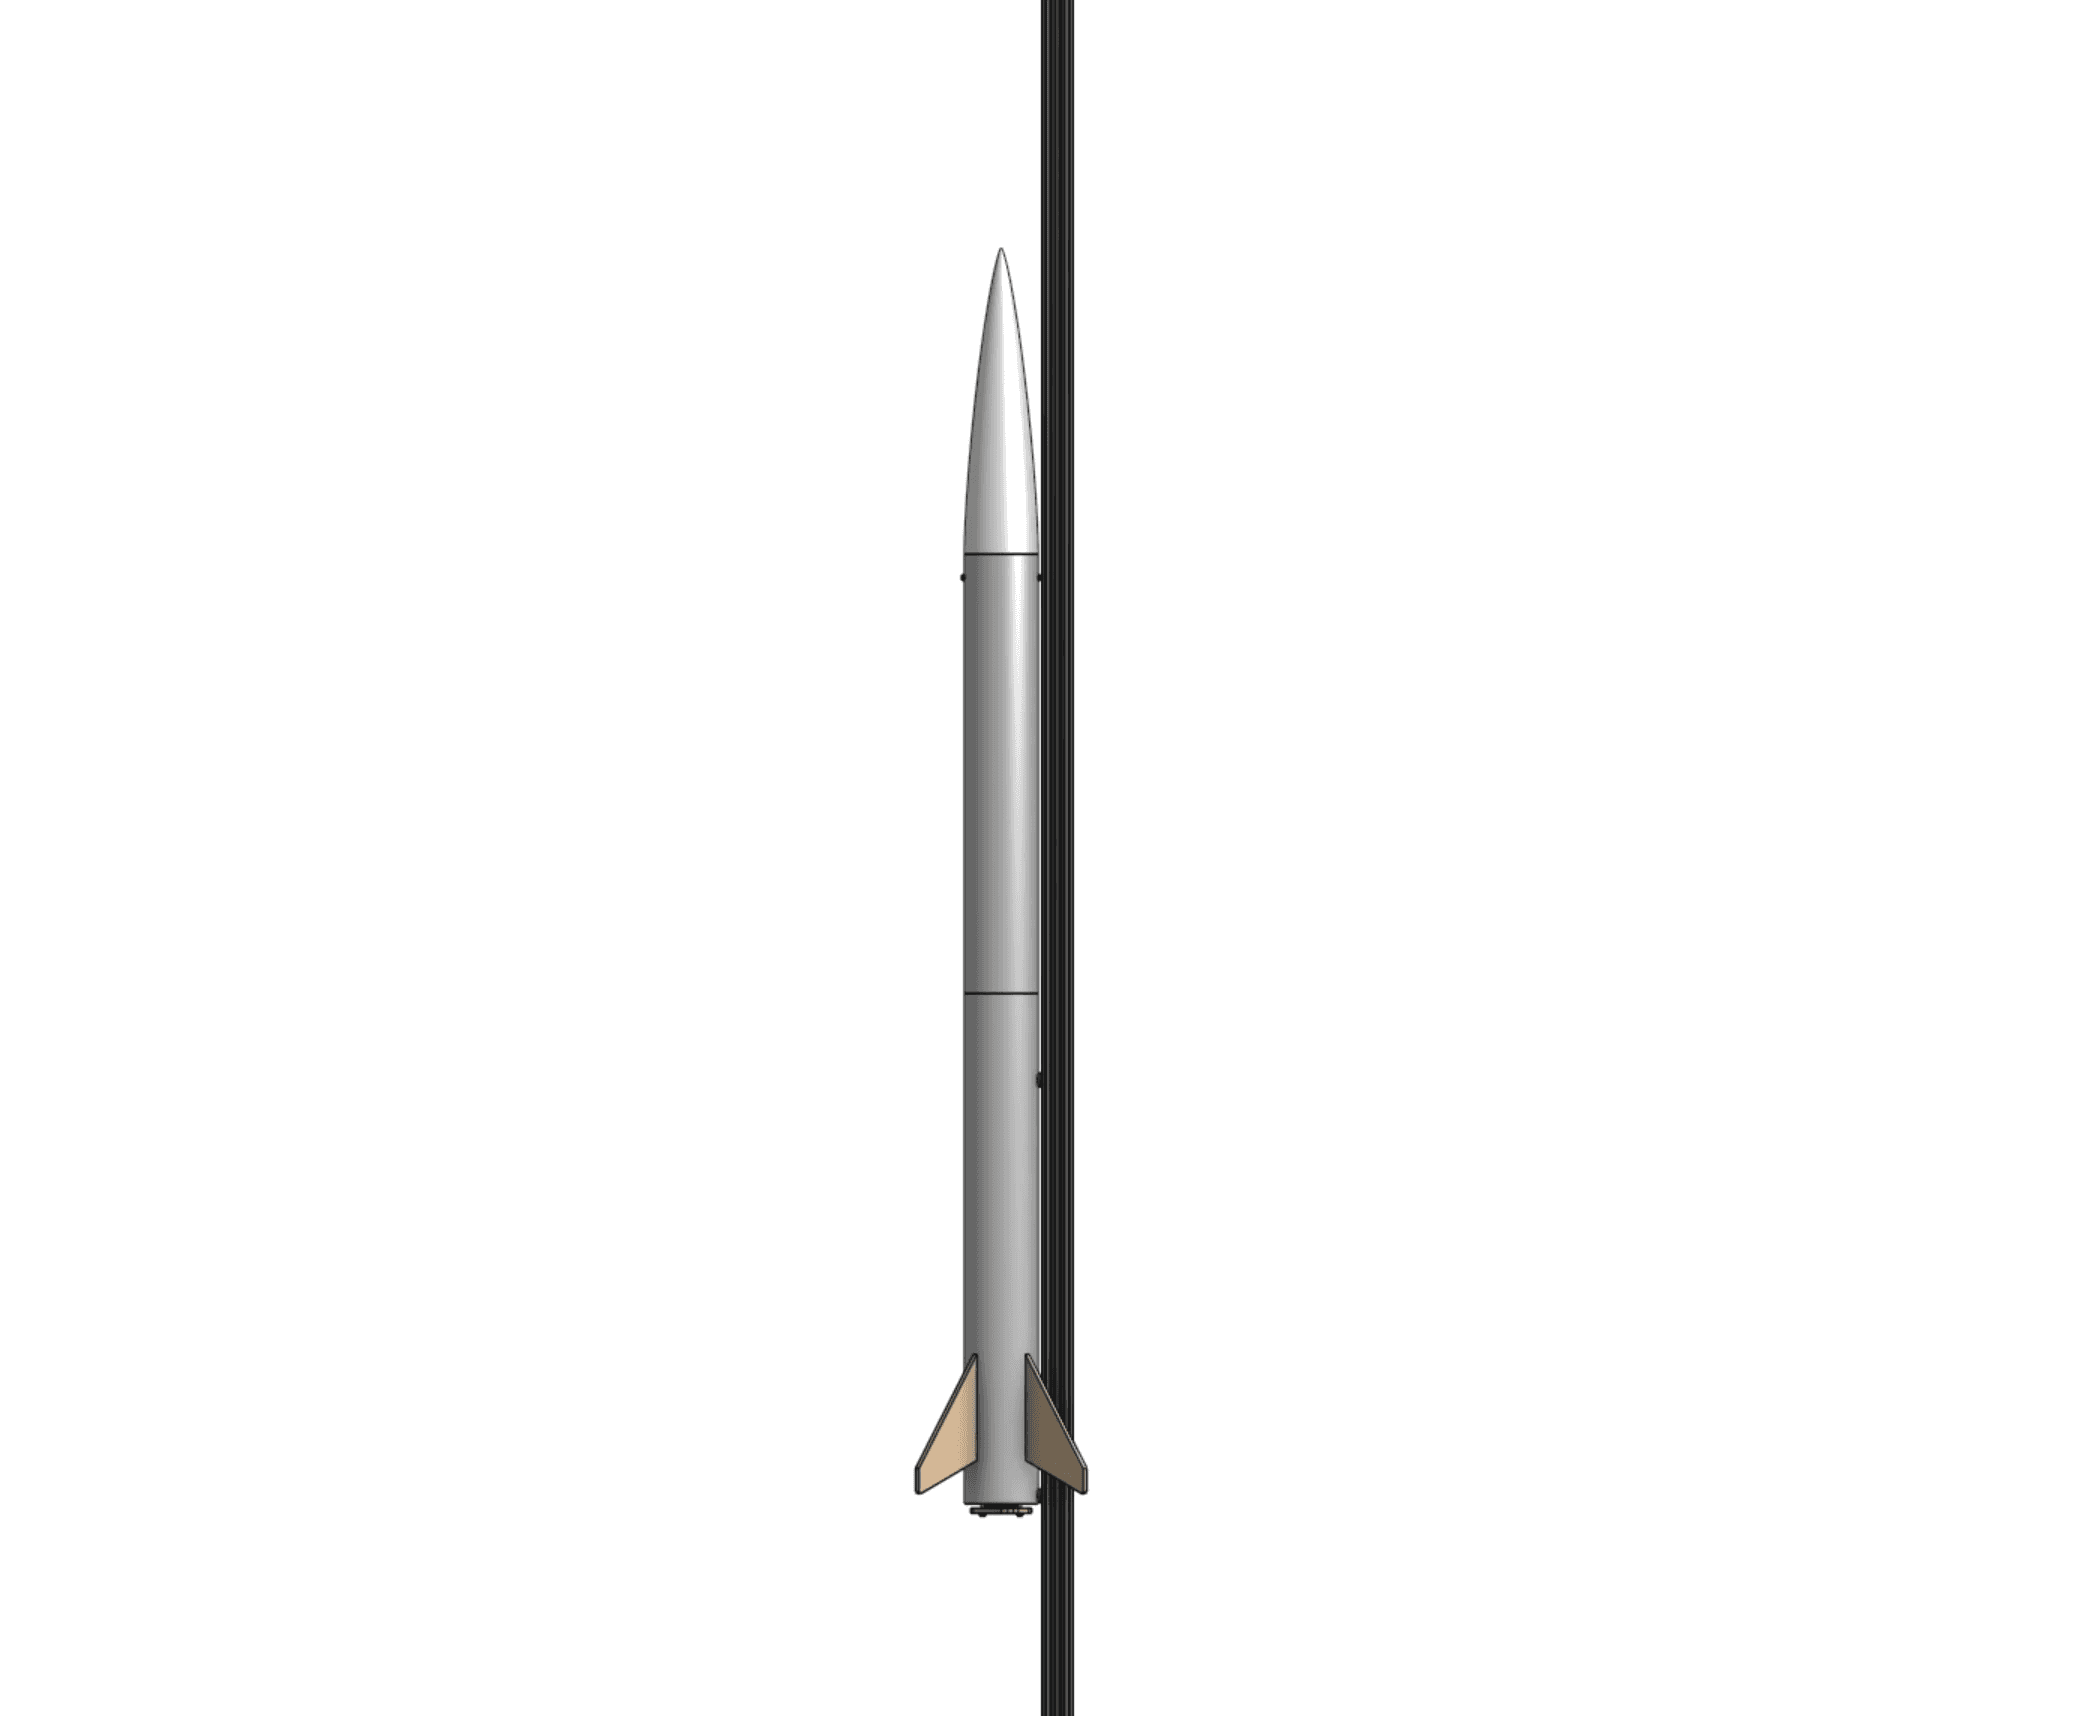
The new L1 rocket will retain most of its predecessor's features — this includes a replaceable nose cone, vertically offset fins, a clipped fin geometry, alongside an design that maintains a good degree of stability across various H/I class rocket motors of different weights and sizes.
The new L1 rocket will also have a larger diameter (90 mm) and length (160 cm) compared to the previous rocket, which had a diameter of 60mm and length of 110 cm. The rocket's dimensions were mainly increased to enlarge its interior, which allows for easier access to internal components alongside additional space for larger components/payloads.
My experience from building and flying the previous L1 rocket also led me to revise certain components to improve their functionality, durability, manufacturing process, and integration in the rocket. Below are the modifications that I have made so far:
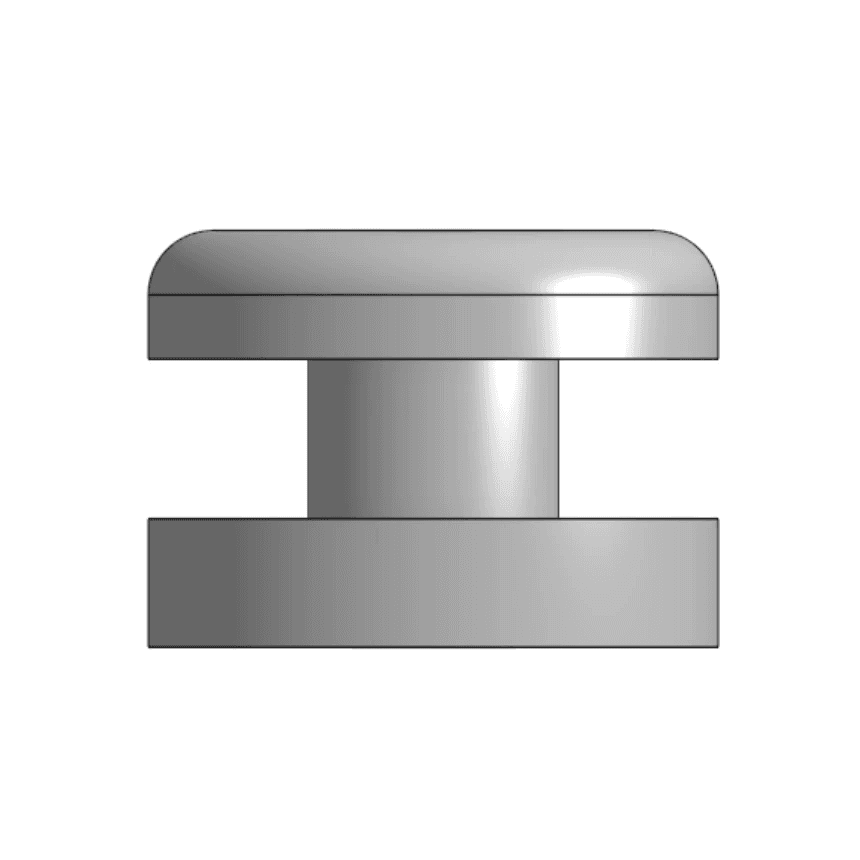
The rail button featured in my previous rocket (see top left) did not slide smoothly along the launch rails (see top right) provided at the launch site, so I increased its height for additional clearance (see bottom right).
The new rail button (see bottom left) also features a base that matches the curvature of the rocket's body tube, which allows it to lie flush against the rocket.

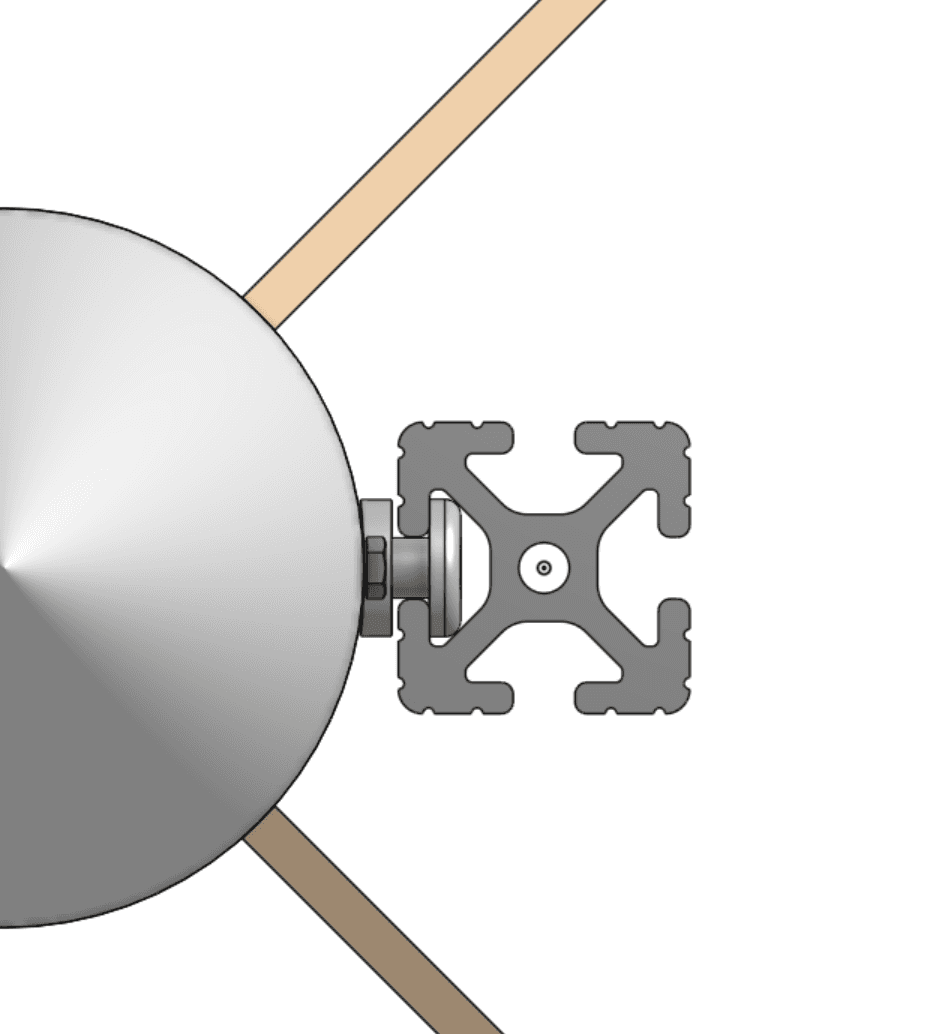
The previous L1 rocket was designed with a 60 mm body tube.
This diameter was rather small and made it difficult to integrate the eye bolt without clearance issues (see left), especially when tying the parachute cord to the eye bolt.
Hence, the new L1 rocket will resolve the clearance issues by featuring 90 mm body tubes.

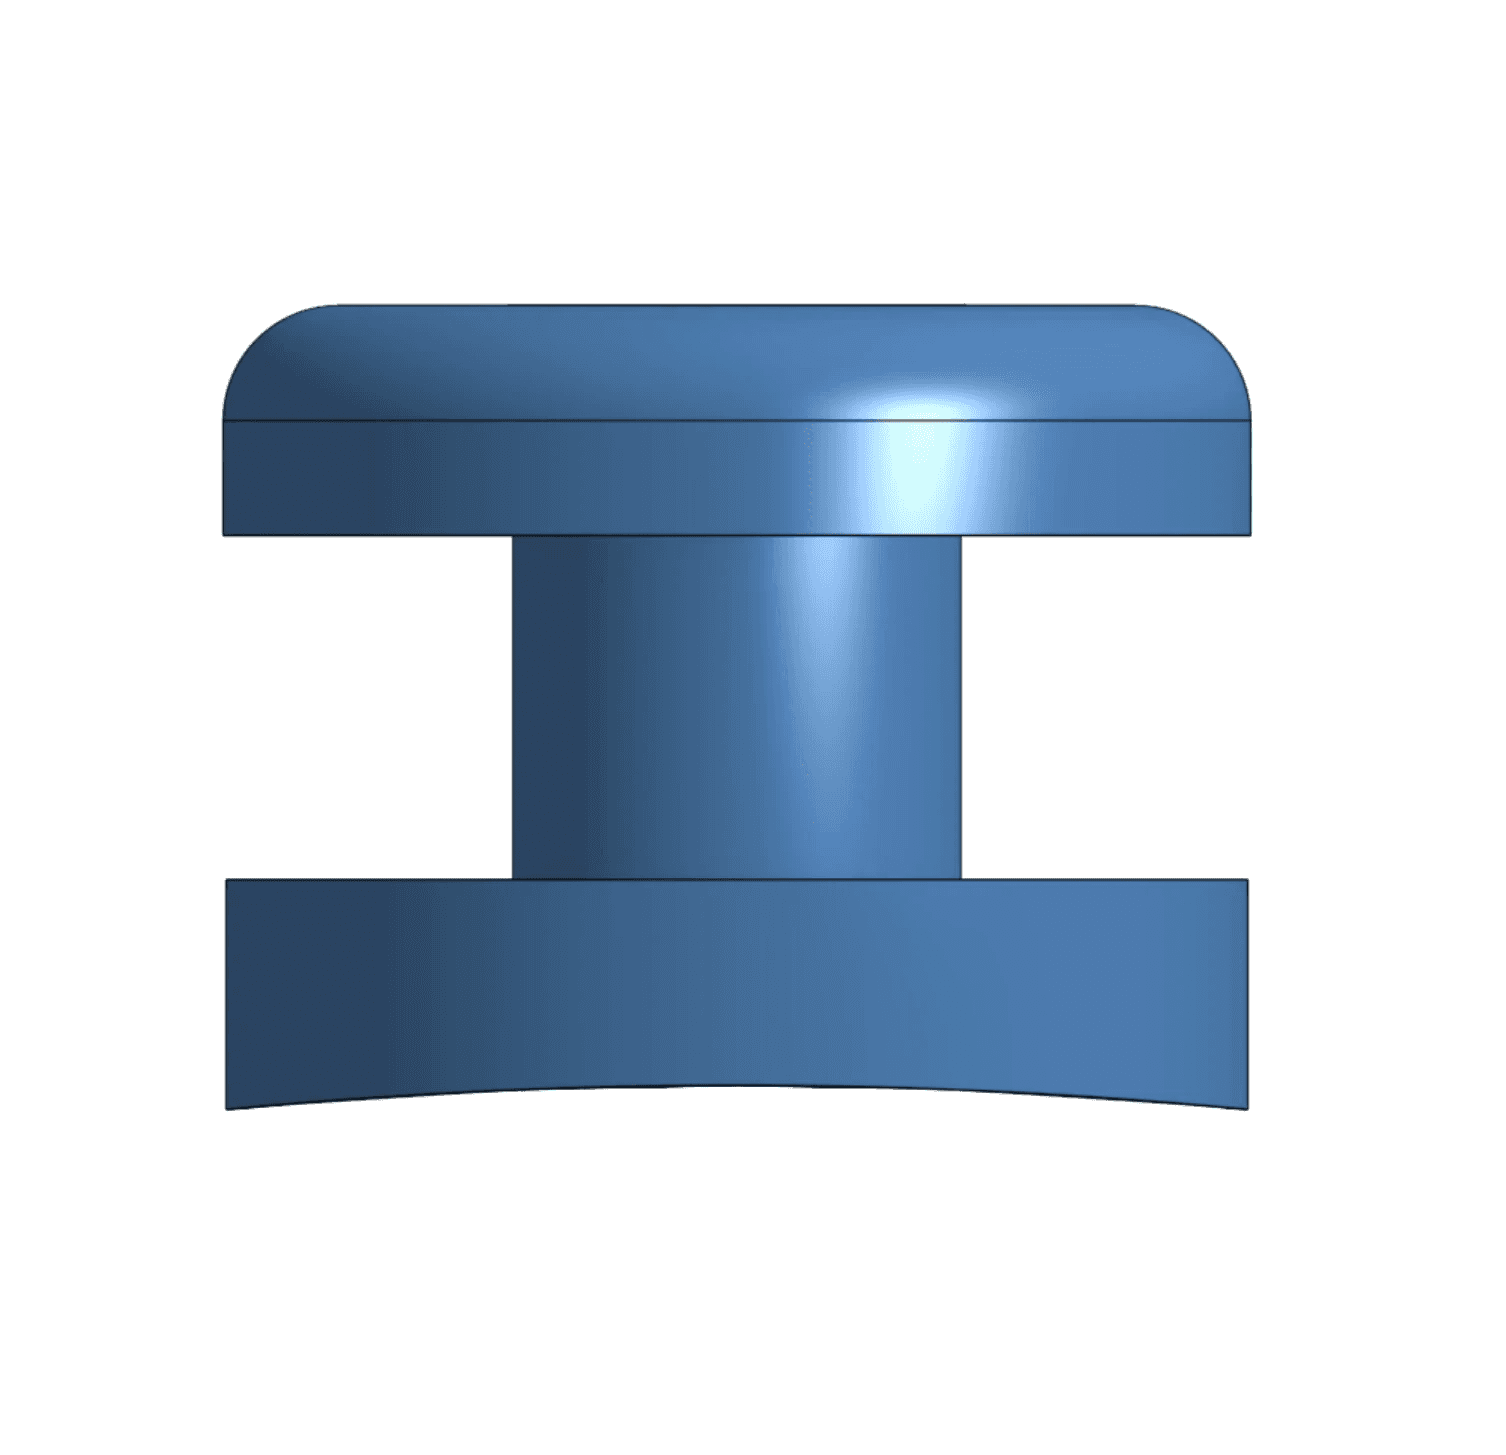
The new L1 rocket's nose cone (right) differs from the original nose cone (left) by featuring a thick bar in place of the plywood bulkhead and eye bolt featured in the original nose cone.
This bar replaces the eye bolt as the attachment point for the parachute cord, which simplifies the nose cone manufacturing process as the nose cone and bar can be 3D printed together as a single component.
The rail button featured in my previous rocket (see top left) did not slide smoothly along the launch rails (see top right) provided at the launch site, so I increased its height for additional clearance (see bottom right).
The new rail button (see bottom left) also features a base that matches the curvature of the rocket's body tube, which allows it to lie flush against the rocket.
The previous L1 rocket was designed with a 60 mm body tube.
This diameter was rather small and made it difficult to integrate the eye bolt without clearance issues (see left), especially when tying the parachute cord to the eye bolt.
Hence, the new L1 rocket will resolve the clearance issues by featuring 90 mm body tubes.
The new L1 rocket's nose cone (right) differs from the original nose cone (left) by featuring a thick bar in place of the plywood bulkhead and eye bolt featured in the original nose cone.
This bar replaces the eye bolt as the attachment point for the parachute cord, which simplifies the nose cone manufacturing process as the nose cone and bar can be 3D printed together as a single component.
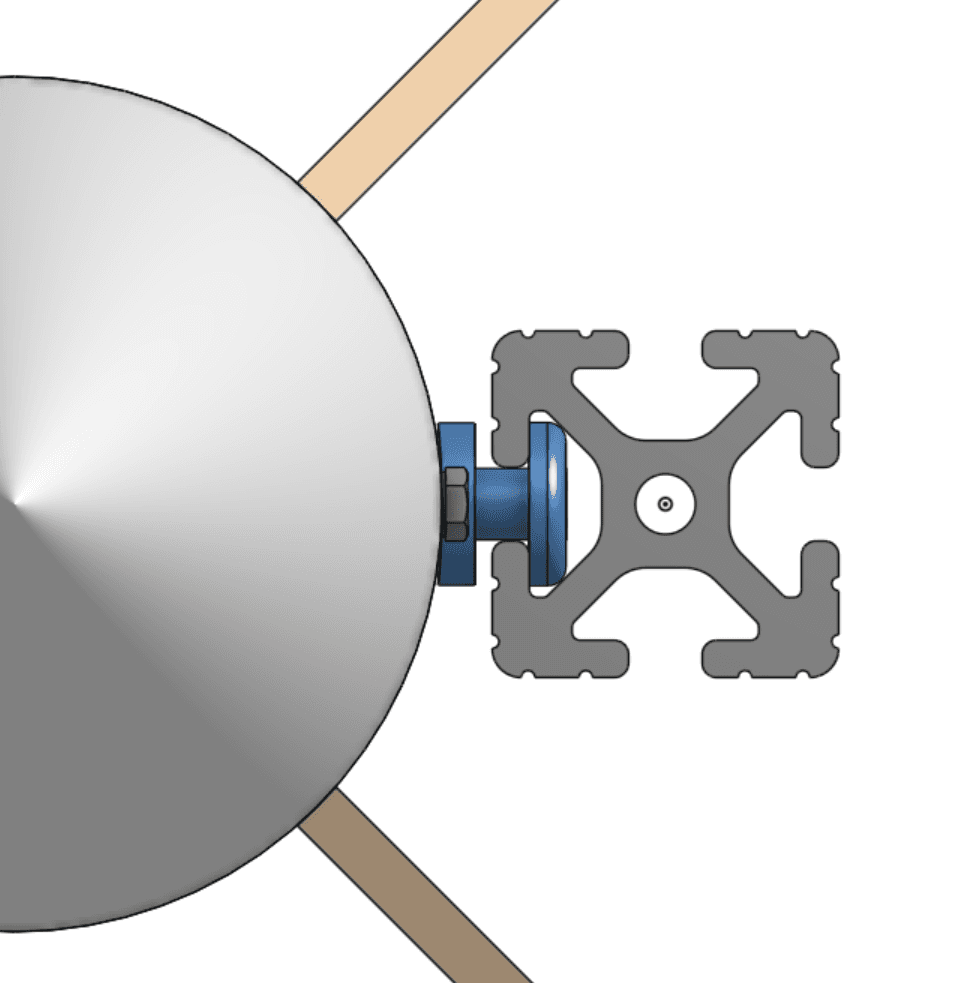
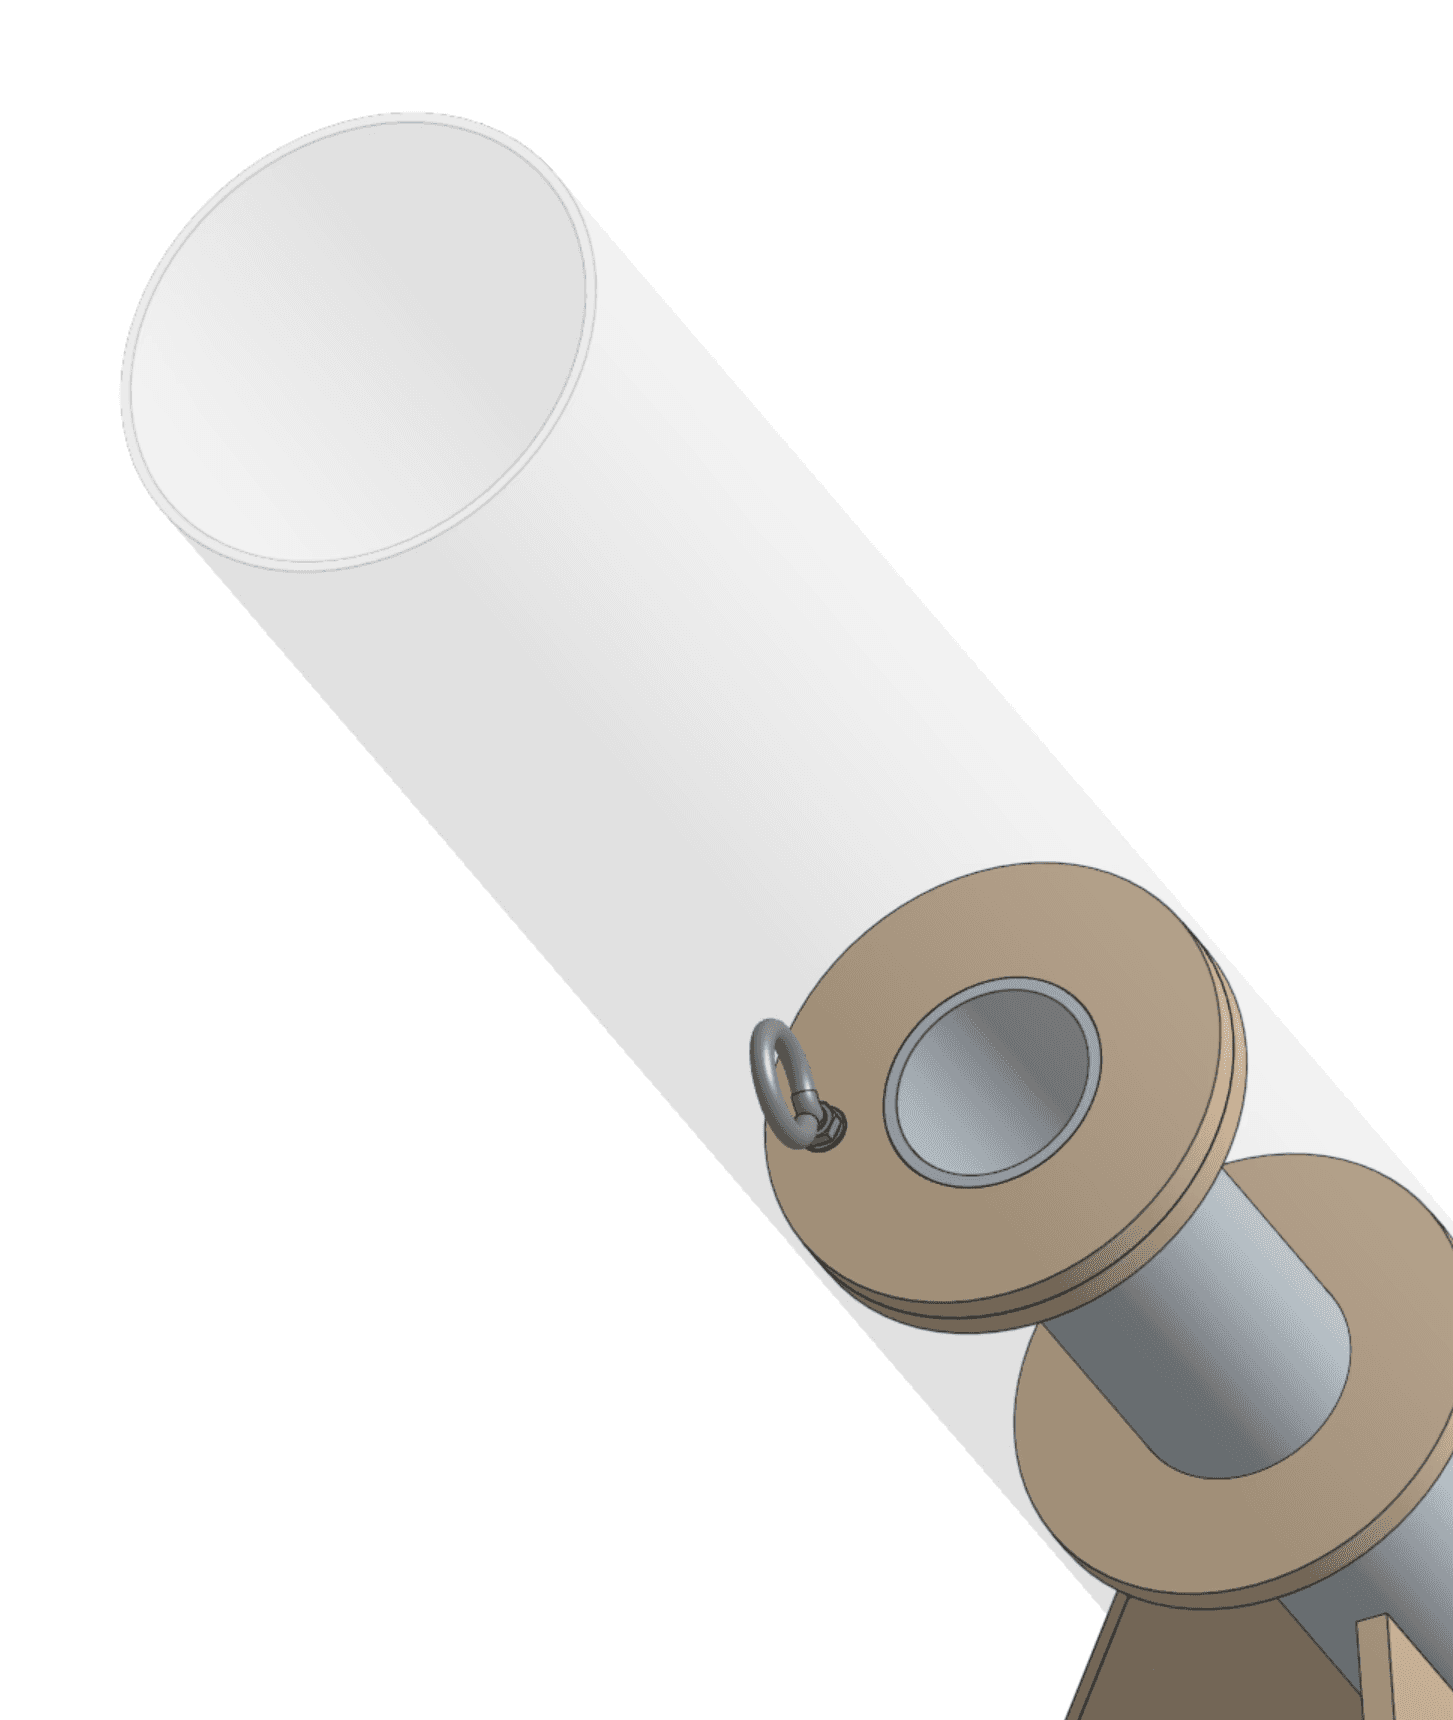
The rail button featured in my previous rocket (see top left) did not slide smoothly along the launch rails (see top right) provided at the launch site, so I increased its height for additional clearance (see bottom right). The new rail button (see bottom left) also features a base that matches the curvature of the rocket's body tube, which allows it to lie flush against the rocket.
The previous L1 rocket was designed with a 60 mm body tube. This diameter was rather small and made it difficult to integrate the eye bolt without clearance issues (see left), especially when tying the parachute cord to the eye bolt. Hence, the new L1 rocket will resolve the clearance issues by featuring 90 mm body tubes.
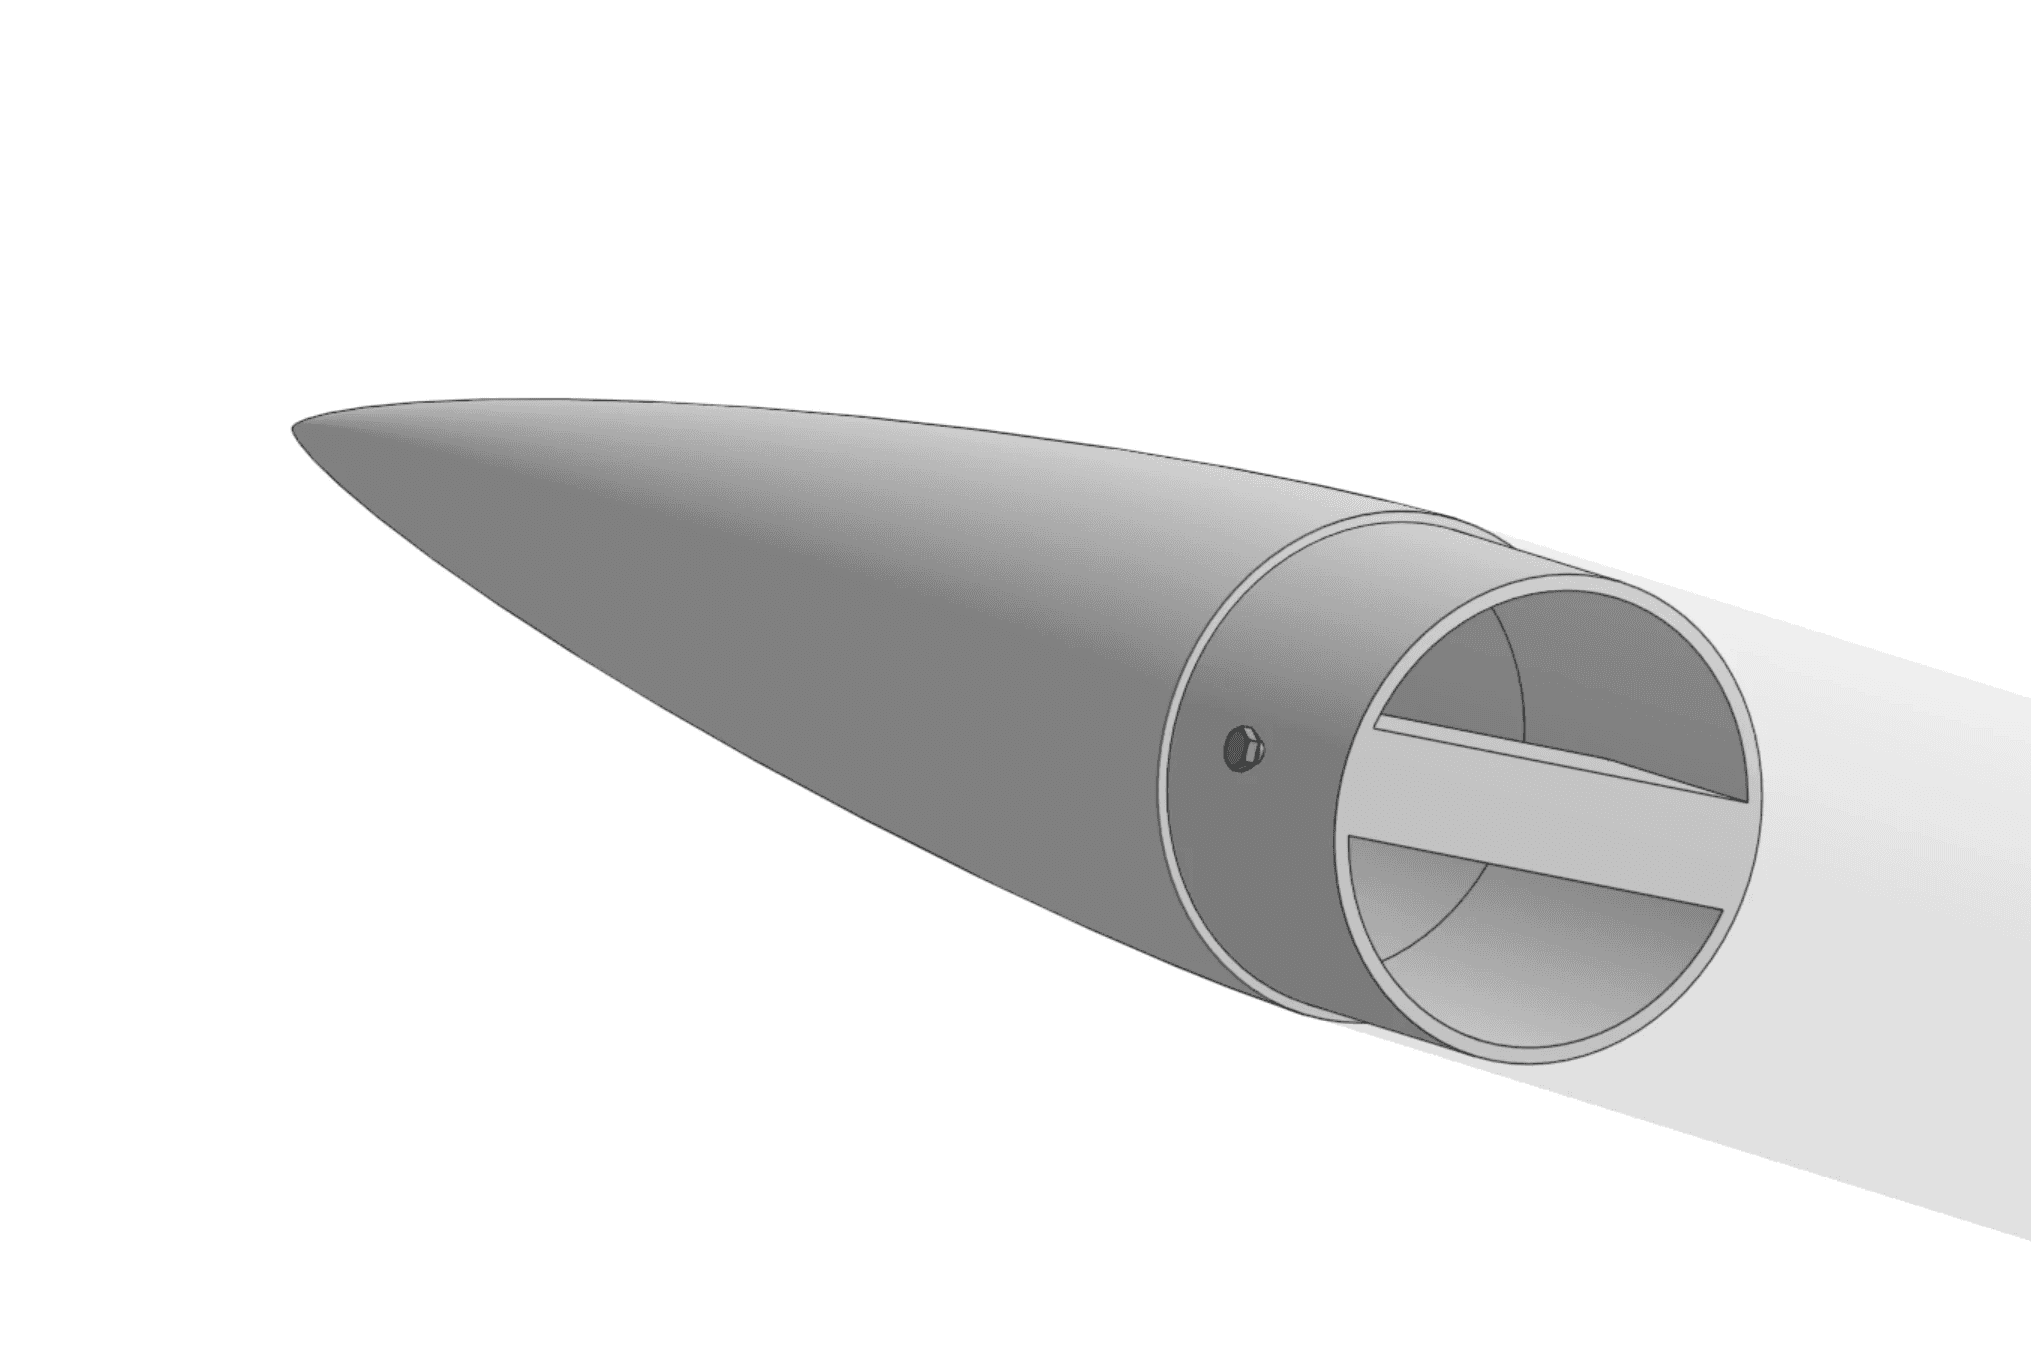
The new L1 rocket's nose cone (right) differs from the original nose cone (left) by featuring a thick bar in place of the plywood bulkhead and eye bolt featured in the original nose cone.
This bar replaces the eye bolt as the attachment point for the parachute cord, which simplifies the nose cone manufacturing process as the nose cone and bar can be 3D printed together as a single component.
The rail button featured in my previous rocket (see top left) did not slide smoothly along the launch rails (see top right) provided at the launch site, so I increased its height for additional clearance (see bottom right). The new rail button (see bottom left) also features a base that matches the curvature of the rocket's body tube, which allows it to lie flush against the rocket.
The previous L1 rocket was designed with a 60 mm body tube. This diameter was rather small and made it difficult to integrate the eye bolt without clearance issues (see left), especially when tying the parachute cord to the eye bolt. Hence, the new L1 rocket will resolve the clearance issues by featuring 90 mm body tubes.
The new L1 rocket's nose cone (right) differs from the original nose cone (left) by featuring a thick bar in place of the plywood bulkhead and eye bolt featured in the original nose cone.
This bar replaces the eye bolt as the attachment point for the parachute cord, which simplifies the nose cone manufacturing process as the nose cone and bar can be 3D printed together as a single component.
manufacturing
I expect to build the new L1 rocket in similar fashion to its predecessor, in which 90 mm cardboard tubes, plywood, PVC piping, PLA, and epoxy will be the primary materials used in this project.
Although I initially planned to build this rocket in late 2024, I decided against it as I want to devote more time to my aerodynamics projects in the meantime. Perhaps when I have some spare time during the holidays, I'll revisit this build!
project name
L1 Rocket (V2)
date
on hold
overview
This is my second attempt in building a high-powered model rocket to obtain the L1 (Level 1) certification from the Tripoli Rocketry Association. The new rocket is based on the first L1 rocket and incorporates my learnings from building and launching its predecessor.
background
I designed and launched a rocket between August and October 2023 to obtain an L1 (Level 1) certification from the Tripoli Rocketry Association (TRA). However, I did not acquire my L1 certification despite the rocket's successful launch and landing as I failed to recover the rocket in time for the post-flight inspection.
Although I was disappointed that I missed the opportunity to obtain an L1 certification, I thoroughly enjoyed the process of designing and building my own rocket, and gained immense satisfaction from the successful launch.
Hence, I'm resolved to build another rocket for the L1 certification, and will be designing this rocket with the learnings I acquired during the previous rocket's build and launch.
My first L1 Rocket [01/10/2024]
new goals
Similarly to its predecessor, the new L1 rocket will be designed to fulfill the L1 certification requirements, which include launching with an H/I impulse class rocket motor, incorporating a parachute recovery system, and being robust enough to remain flightworthy after launch and recovery. Thus, the challenges identified in my first L1 project also apply to this project.
In this project, the challenges regarding durability are important concerns as I did not manage to recover my previous rocket and inspect it for damage.
Given the possibility that my previous L1 rocket was not robust enough to remain flightworthy after launch and recovery, I decided to err on the side of caution by designing the new L1 rocket with a greater emphasis on durability.
I also believe that the previous L1 rocket's design could have been simplified to reduce its manufacturing duration, and plan to incorporate this in the upcoming L1 rocket design.
Hence, my primary goals for the revised L1 rocket's design are:
#1
To reuse components that worked well in the previous L1 rocket and adapt them to the new design if needed,
#2
To design components that minimize potential points of failure in the new L1 rocket.
#3
To avoid redundant components in the new L1 rocket and maintain simplicity in its components' design.
key design choices & revisions
The new L1 rocket will retain most of its predecessor's features — this includes a replaceable nose cone, vertically offset fins, a clipped fin geometry, alongside an design that maintains a good degree of stability across various H/I class rocket motors of different weights and sizes.
The new L1 rocket will also have a larger diameter (90 mm) and length (160 cm) compared to the previous rocket, which had a diameter of 60mm and length of 110 cm. The rocket's dimensions were mainly increased to enlarge its interior, which allows for easier access to internal components alongside additional space for larger components/payloads.
My experience from building and flying the previous L1 rocket also led me to revise certain components to improve their functionality, durability, manufacturing process, and integration in the rocket. Below are the modifications that I have made so far:
The rail button featured in my previous rocket (see top left) did not slide smoothly along the launch rails (see top right) provided at the launch site, so I increased its height for additional clearance (see bottom right).
The new rail button (see bottom left) also features a base that matches the curvature of the rocket's body tube, which allows it to lie flush against the rocket.
The previous L1 rocket was designed with a 60 mm body tube.
This diameter was rather small and made it difficult to integrate the eye bolt without clearance issues (see left), especially when tying the parachute cord to the eye bolt.
Hence, the new L1 rocket will resolve the clearance issues by featuring 90 mm body tubes.
The new L1 rocket's nose cone (right) differs from the original nose cone (left) by featuring a thick bar in place of the plywood bulkhead and eye bolt featured in the original nose cone.
This bar replaces the eye bolt as the attachment point for the parachute cord, which simplifies the nose cone manufacturing process as the nose cone and bar can be 3D printed together as a single component.
The rail button featured in my previous rocket (see top left) did not slide smoothly along the launch rails (see top right) provided at the launch site, so I increased its height for additional clearance (see bottom right). The new rail button (see bottom left) also features a base that matches the curvature of the rocket's body tube, which allows it to lie flush against the rocket.
The previous L1 rocket was designed with a 60 mm body tube. This diameter was rather small and made it difficult to integrate the eye bolt without clearance issues (see left), especially when tying the parachute cord to the eye bolt. Hence, the new L1 rocket will resolve the clearance issues by featuring 90 mm body tubes.
The new L1 rocket's nose cone (right) differs from the original nose cone (left) by featuring a thick bar in place of the plywood bulkhead and eye bolt featured in the original nose cone.
This bar replaces the eye bolt as the attachment point for the parachute cord, which simplifies the nose cone manufacturing process as the nose cone and bar can be 3D printed together as a single component.
manufacturing
I expect to build the new L1 rocket in similar fashion to its predecessor, in which 90 mm cardboard tubes, plywood, PVC piping, PLA, and epoxy will be the primary materials used in this project.
Although I initially planned to build this rocket in late 2024, I decided against it as I want to devote more time to my aerodynamics projects in the meantime. Perhaps when I have some spare time during the holidays, I'll revisit this build!